One-Click Lightroom Tip, Brighten Those Edges! | Tips for Photographers
While I definitely don't claim to be a Lightroom wizard, there are a few things I've learned. Some stuff is obvious and I'm sure most users of LR out there are doing the same...but...there are a few things that I think are kind of "hidden" tricks. Andddd today, I'm going to share one of those with you!
Let me begin by saying that Lightroom is one the most impressive tools for photographers I have ever in my days come across. I mean really. Ingenuity for dayyyyyys I tell you!
Before I can dive into the HOW ya fix this, you need to understand WHAT exactly it is we're fixing here. So, it's time for a question!! Did you know that all lenses have at least some distortion to them? No matter how top of the line, how expensive, how fancy...there's some distortion. What do I mean by distortion?
Simply put, lenses will create a little bit of a curved line, or curved edge if you will, to your images, and that curve is typically kind of shadowed, creating a darker edge on the edges of your image! The two most common types of lens distortion are barrel distortion and pincushion distortion. Please, for the love, Google those, don't ask me to dive into their definitions.
Okay, so what's this one spiffy little one-click tip I speak of? How can I brighten the edges of my images and rid myself of lens distortion!?
Introducing: Lightroom's one-click solution, the "Enable Profile Corrections" option!
Ever heard of that? Yeah, I hadn't either.
Take a look at your Lightroom Develop Module...Scroll on down until you land on the Lens Correction tab, and there she be, y'all. The glorious box for enabling profile corrections. Mine is already selected in the screenshot below:
Lightroom....and their impeccable ingenuity has Lens Profile settings for endless lenses... I have yet to find a lens that isn't in there! And you don't even have to worry about looking your lens up.. Did I mention that!? All you do is check the box for "Enable Profile Corrections" and the wizardry of LR finds the lens you shot with and applies the corrections. AMAZING.
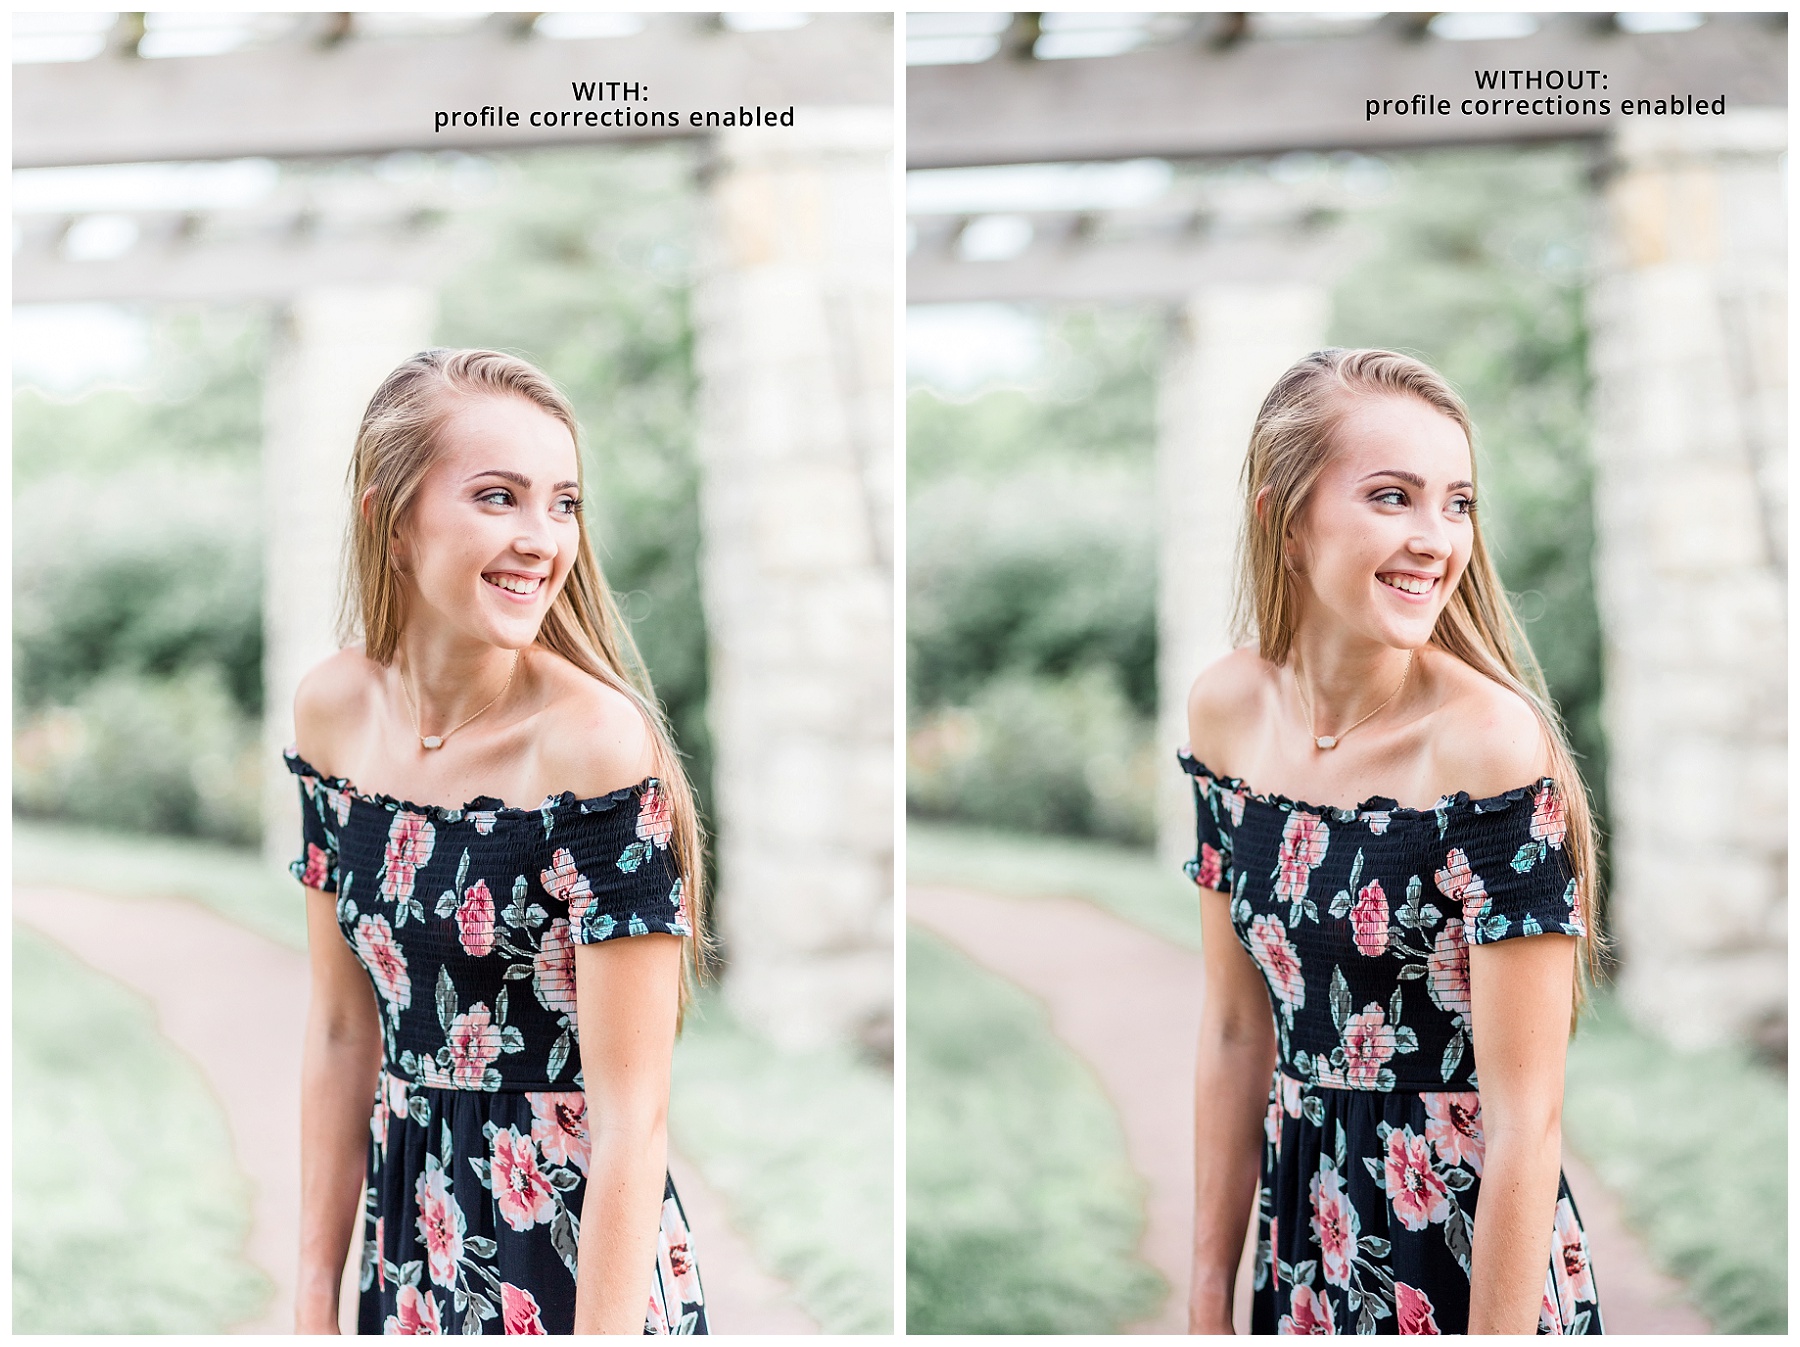
Want to see what happens when you do this? Take a look at the three sets of images below. Each are noted, the left side is WITH profile corrections enabled, and the right side is WITHOUT:
See how the areas in the corners and edges become SO much more shadowed and dark when I don't have the profile correction enabled!? I feel like that doesn't even look like MY editing style!
In this shot, it's a tad harder to see - but look closely at the edges and you can pinpoint the darkness. I feel like it isn't AS bad in this shot, but overall, if my goal is consistency, I'm going to want to brighten all edges of all shots!
This example of high school senior Emma baffles me the most. I feel like the image on the right, which is WITHOUT the profile corrections enabled....doesn't even look like a finished edit! It looks like I stopped editing before my true editing style was complete!
It's no secret that I'm all about the light, airy, soft, ethereal image editing style... so this whole brightening up the edges falls right into that vein of thought for me!
Now, let's state the obvious... You might LIKE the dark edge look, truly it does have a little bit of a vignette quality, and some people like that! Especially if that's what you're going for! My overall goal with my images though, is the whole light, airy and soft, and I want my images to maintain the consistent look and feel of that style! So, enabling profile corrections on the regular is my jam.
Tell me! Which do you prefer for your own edits!? I'd love to hear your thoughts!


